Creating and Delivering Formative Assessments from District Purchased Item Banks
- Subscribe to RSS Feed
- Mark as New
- Mark as Read
- Bookmark
- Subscribe
- Printer Friendly Page
- Report Inappropriate Content
FORMATIVE ASSESSMENTS | ITEM BANKS
ACCESSING MASTERY CONNECT
Log in to your Mastery Connect account using your Canvas course, your SSO Dashboard (ie Clever) or masteryconnect.com.
CREATING AN ASSESSMENT FROM AN ITEM BANK
- Once you are logged in, click on "Assessments" at the top
- You can also create directly in your Tracker by clicking "Add Assessment" in the top right of your Tracker screen
- Click the blue button “+ Add Assessment”
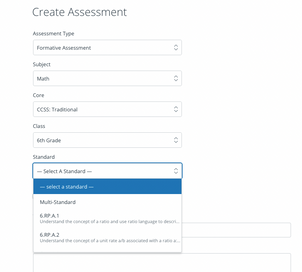
- In the first drop down choose your subject
- Choose your core -- be sure your core matches the core used when creating your Tracker
- Choose your class -- remember class means grade or specific course name
- Choose whether you want to create a single or multi-standard assessment
- Add the title of your assessment
DISTRICT PURCHASED ITEM BANKS
- Click on the drop down under Assessment Source
- Scroll down below Document-Based and you should see “Item Based”
- Under “Item Based” you should see Item Banks your district has purchased
- Choose the Item Bank that fits your needs -- remember you can pull from multiple item banks in the same assessment
- Use the filter boxes to:
- Choose and switch standards if doing a multi-standard assessment
- Choose Question Type
- Choose DOK level
- Choose English and/or Spanish
- Select questions from the left side to add to the right side of the assessment
MASTERY CUT SCORE GRADING
- Once you have finished choosing questions, input your Mastery Cut Scores
- For more information on Mastery Cut Scores, please see our previous blog post from Victoria!
PRO TIP: If you switch between a single and multi-standard assessment while you are creating it, the assessment will reset and remove previously chosen items.
|
FORMATIVE ASSESSMENTS | DELIVERING ASSESSMENTS
SINGLE-STANDARD ASSESSMENT
- Hover over the standard the assessment is linked to and on the drop down menu click “Assess”
- Once the standard is open, find the correct assessment and click the “Assess” button above that assessment
- This will bring up the option for Test ID or Student Portal
MULTI-STANDARD ASSESSMENT
- On your Tracker’s main page, find the assessment you are going to deliver
- Hover over the assessment name and on the drop down menu click “Assess”
- Then click "Assess" again over the columns of standards -- any of the “Assess” buttons will allow you to deliver the test
- This will bring up the option for Test ID or Student Portal
TEST ID OR STUDENT PORTAL
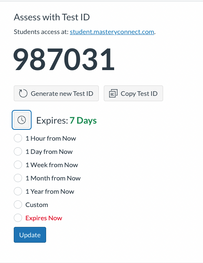
- Assess with Test ID
- Six digit code unique to specific Tracker
- Generating a new Test ID will negate the previous ID
- Click the clock icon next to "Expires" to change the expiration date
- This method requires students to have the Test ID to access the assessment
- Assess with Student Portal
- Toggle the button to provide access to students
- This method gives students access to the assessments directly from the teacher -- this allows students to take an assessment WITHOUT a Test ID
- Students can log in to the portal from anywhere and start the assessment without being in class
PRO TIP: When using Test ID, click the clock icon to change when the Test ID will expire. "Expire Now" will end the current Test ID and a new ID will need to be generated before students can continue the test. Be sure to click "Update" when finished.
|
FORMATIVE ASSESSMENTS | TAKING THE ASSESSMENT
LOGGING IN TO THE ASSESSMENT
- Students will go to student.masteryconnect.com or their Canvas course
- If taking an assessment with a Test ID, students will be prompted to enter the Test ID
- They will then be prompted to enter their Student ID -- this can be found next to the student’s name in the Mastery Tracker
- If taking an assessment through a Canvas course, students will take the assessment as they would an assignment in Canvas
- If taking an assessment in the Mastery Connect Portal, students will see the assignment when they access the Student Portal
TAKING THE ASSESSMENT
- Questions will be on the screen one at a time
- By using the numbered bar and the blue arrows, students can go from one question to the next
- Student accommodations are found on the right of their screen
- This bar can be expanded using the arrow at the bottom
- Students are allowed only those accommodations provided by the teacher or district administrator when the assessment was created
- When students are finished they will click “Finish” in the top right corner
- A window will come up letting students know of any unattempted questions and/or if they are sure they want to submit the assessments -- students can click "No" if they would like to go back and fix any questions
- Once submitted, depending on the assessment, students will either see:
- You’re Finished, their score, and their color for each standard assessed
- You’re Finished and no score if the disabled for students and/or the teacher still needs to grade additional questions
PRO TIP: Student answers on the test are saved automatically. Students can pause, then resume or exit the test and come back at a later time, as long as they do not click "Finish" and "Submit". Students will just need the Test ID to resume testing. |
FINAL THOUGHTS
Creating assessments using district purchased Item Banks can help increase rigor and alignment in your assessments. Delivering these assessments in Mastery Connect can provide real-time data on how your students are doing on their journey to mastering the standards.
Our Mastery Services team provides expert professional development, strategic consulting, and alternative options designed to support the vision, goals, and adoption of Mastery products. If you would like to learn more about our services check out our Professional Development Options and contact your CSM for more information!
Don't forget to watch the Blog Video about this post and we would love to hear from you, so please comment below!
You must be a registered user to add a comment. If you've already registered, sign in. Otherwise, register and sign in.


